Leather is prized for its softness, durability, and timeless appeal—but one wrong cleaning product or technique can turn supple leather stiff, faded, or cracked. Whether it’s your favorite leather jacket, car seats, couch, or designer bag, cleaning leather requires a gentle touch that lifts dirt without stripping its natural oils. Below is a step-by-step guide to safe leather cleaning, plus expert tips to preserve texture and keep leather looking its best for years.
First: Identify Your Leather Type (Critical for Safe Cleaning)
Not all leather is the same—using the wrong method can ruin delicate finishes. Start by testing a small, inconspicuous area (e.g., inside a jacket cuff, under a couch cushion) before cleaning the entire surface:
- Full-Grain Leather: The most durable (no sanding or coating), with natural pores. It’s forgiving but needs gentle, moisturizing cleaners.
- Top-Grain Leather: Sanded to remove blemishes, often with a protective finish. Resists stains but still requires non-abrasive products.
- Bonded Leather: Made from leather scraps bonded with glue—fragile and prone to peeling. Avoid excess moisture.
- Faux Leather (Vegan Leather): Synthetic (PVC or polyurethane). Can tolerate mild soaps but not harsh chemicals.
For all types, avoid alcohol, bleach, ammonia, or citrus-based cleaners—these break down leather’s natural oils and damage its texture.
Step-by-Step Safe Leather Cleaning Process
Gather your supplies first (all gentle, leather-friendly items):
- Soft microfiber cloths (avoid paper towels—they scratch).
- A soft-bristled brush (toothbrush or dedicated leather brush, for crevices).
- Mild, pH-neutral soap (e.g., castile soap, saddle soap, or leather-specific cleaner).
- Distilled water (tap water may have minerals that leave spots).
- Leather conditioner (to restore moisture after cleaning).
1. Remove Loose Dirt & Dust (Dry Cleaning First)
Never start with water—dry debris can scratch leather when rubbed with a damp cloth.
- Use a soft-bristled brush to gently sweep away dust, crumbs, or pet hair from creases and seams.
- For larger items (e.g., couches, car seats), use a vacuum with a soft brush attachment to lift embedded dirt without pressure.
- Wipe the surface with a dry microfiber cloth to pick up any remaining dust.
2. Mix a Gentle Cleaning Solution
Harsh soaps strip leather of its natural oils—stick to mild, moisturizing formulas:
- Combine 1 cup distilled water with 1–2 teaspoons of pH-neutral soap (or a leather-specific cleaner). Stir until suds form (avoid shaking vigorously—too many suds leave residue).
- For very delicate leather (e.g., lambskin, vintage leather), skip soap entirely: Use a slightly damp microfiber cloth to lift dirt.
3. Clean Gently (No Scrubbing!)
The goal is to “lift” dirt, not rub it into the leather:
- Dip a microfiber cloth into the soapy water, then wring it out completely (it should be damp, not wet—excess water soaks into leather and causes warping).
- Wipe the leather in gentle, circular motions, focusing on dirty areas (e.g., armrests, car seat bolsters).
- For stubborn spots (e.g., dried food, light stains), use the soft-bristled brush to gently agitate—never scrub hard.
- Rinse the cloth with clean distilled water, wring dry, and wipe away any soap residue.
4. Dry Properly (Avoid Heat!)
Leather hates heat and direct sunlight—both dry it out and crack the texture:
- Pat the leather with a clean, dry microfiber cloth to absorb excess moisture.
- Let it air-dry in a cool, well-ventilated area (away from radiators, heaters, or windows).
- Never use a hair dryer, heater, or direct sun to speed up drying—this is the #1 cause of stiff, damaged leather.
5. Condition to Restore Softness
Cleaning removes dirt and some natural oils—conditioning is non-negotiable to preserve texture:
- Once the leather is fully dry (this can take 2–4 hours, depending on thickness), apply a small amount of leather conditioner to a clean cloth.
- Rub the conditioner into the leather in circular motions, covering every inch.
- Let the conditioner absorb for 15–30 minutes, then buff away excess with a dry cloth.
Conditioning keeps leather supple, prevents cracking, and enhances its natural luster—aim to do it every 3–6 months (more often for frequently used items like car seats).
Expert Tips to Avoid Damaging Leather Texture
- Treat Stains Immediately: Blot spills (e.g., coffee, oil) with a dry cloth—don’t rub! For oil stains, sprinkle cornstarch or talcum powder on the spot, let sit overnight, then brush away before cleaning.
- Skip Abrasives: No scouring pads, scrub brushes, or magic erasers—they scratch leather’s surface and ruin its smoothness.
- Test Products First: Even “leather-safe” cleaners can react with certain finishes. Always test on a hidden area first.
- Choose Products That Nourish: Look for cleaning solutions that include moisturizing ingredients (e.g., jojoba oil, beeswax) to clean and protect—this avoids leaving leather dry or stiff.
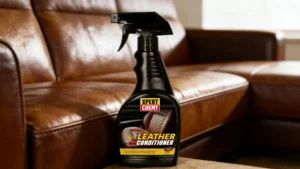
For a hassle-free option that cleans gently while preserving texture, consider a leather cleaner-conditioner combo that’s formulated to lift dirt without stripping natural oils. Products like these simplify the process and ensure your leather gets the care it needs—visit xpertchemy.com to explore leather care solutions designed for safety and effectiveness.
Final Thoughts: Clean Leather = Long-Lasting Leather
The key to cleaning leather without damage is “gentle” at every step: gentle products, gentle motions, and gentle drying. By avoiding harsh chemicals, excess moisture, and abrasives, you’ll lift dirt while preserving leather’s soft, luxurious texture.
Whether you’re cleaning everyday items or heirloom leather pieces, taking the time to use safe methods pays off—your leather will stay soft, supple, and beautiful for years. For reliable leather care products that prioritize texture preservation, check out xpertchemy.com and give your leather the gentle cleaning it deserves.